 What I’m about to go though are the four beginning cornerstones of dSLR videography. Knowing how to use these aspects of your camera means that your images will look better right out of the camera and also provide you with the rules you can change in order to get your own unique shots. Any key words listed are clickable to relevant websites that will give much more information than I am going to list, but you don’t need to know the history or the mathematical equations being performed to be able to use your dSLR.
The 4 Parts That Make Up Your Shot
Aperture – This is the hole that lets light into the camera, meaning controlling how wide or how small this hole is determines how exposed or bright your image is going to be. The size of the aperture is measured in f-stops, and, the lower the number of f-stop a lens is able to reach, the wider the hole will be and the more light it can let in.
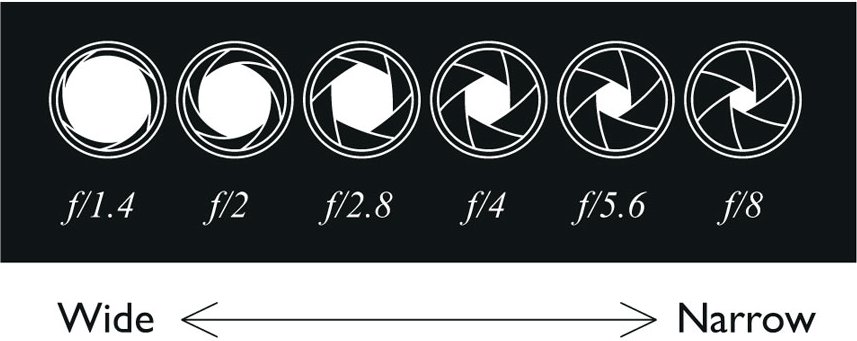
The aperture is controlled within the lens. For an example, let’s look at the Canon 18-55 f/4 lens that is the common kit lens from the Canon Rebel line of dSLRs. This lens has a aperture range of f/4 – f/29. If you open this lens all the way up, you’ll be shooting with your camera set to f/4, or, if you are shooting in bright sunlight, you can close the hole down to f/29.
ISO – This is adjusting the actual digital reading and letting the camera know what the sensor can sense. On a bright day or in a well lit room, you can use the minimal ISO 100 which won’t leave any digital artifact, but as you move to lower light situations, you’ll need to use higher ISOs and you’ll need to be aware that you’ll be adding digital artifact to the recorded image.
When filming, try and only use ISO 100, 320, 640, 1250. While this doesn’t always work (sometimes you have to crank it up even higher for low light) it’s a good rule of thumb.
Something that might help you remember this – I think of it like a guitar. At ISO 100, there is no distortion, for a guitar it’s the equivalent of a clean acoustic sound. You are telling the camera to only record what is easiest to read. As you move the ISO higher, you are adding more distortion, letting the camera record some information that might not be totally true. Going back to the guitar analogy, ISO 320 is more like a clean electric guitar sound, while ISO 6500 is like Nirvana.
*Stands for the Greek word for Equal, isos, which doesn’t really matter*
Frame Rate – This is the measurement of how many ‘frames’ of film are being recorded in a second (fps). The standard settings are 24fps (or 25 fps in Europe or PAL based countries) and 30fps, with many cameras now offering 60fps and 120fps.
- 24fps is used to create the standard movie look, in the US, and 25fps in Europe and PAL based countries.
- 30fps is used more in documentary style films and can sometimes look a little too sharp for movies.
- 60fps and 120fps are used to create slow motion footage, where the image is recorded with more frames packed into a second so they can be stretched out in post production and still maintain the average 24 or 30 fps look.
Shutter Speed – The amount of time the shutter is open. For best, standard looking results, you want to use a shutter speed that is roughly twice the number of your frame rate. For example, with a frame rate of 24fps, you’ll want to use a shutter speed of 48 (but most cameras only work in multiples of 10, so it would be 50), then for 30fps you’ll want to use a shutter speed of 60. Speeding up or slowing down the shutter speed changes the look of the image being captured; increasing the shutter speed makes the images crisper and choppier, slowing it down makes movement blur and blend together.
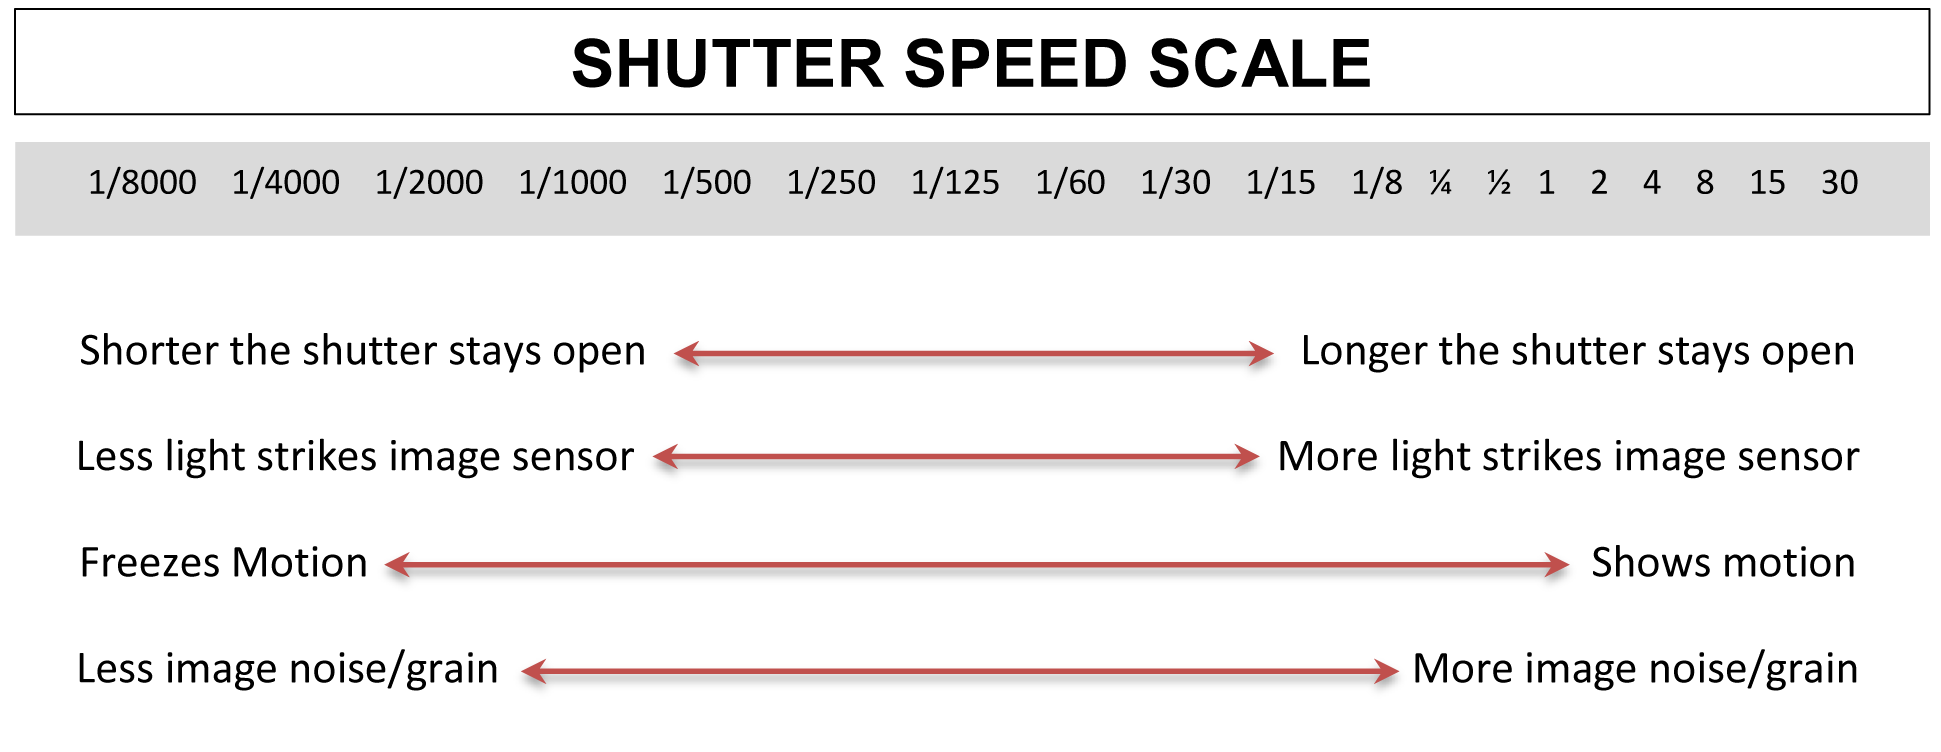
Also, lowering the shutter speed allows more light in the image, so in a pinch you can drop the shutter speed slightly and get a brighter image.